Telnet and SSH Access
Console access is one way of accessing the CLI of a router or a switch. What if the administrator wants to access the device from a remote location? We can use well known protocols like Telnet and SSH (Secure SHell). Both of them are application layer protocols used to take remote access and manage the device. Let's read more about each of these protocols and how to configure them in the device to enable remote access in this blog.
TELNET
Telnet is an application layer protocol based on a reliable connection oriented transport. This protocol is used to establish a connection to Transmission Control Protocol (TCP) port number 23, where a Telnet server application is listening. It provides the user a terminal session to this remote host server from the telnet client application.
Few such client applications are
- SecureCRT
- TeraTerm
- Putty
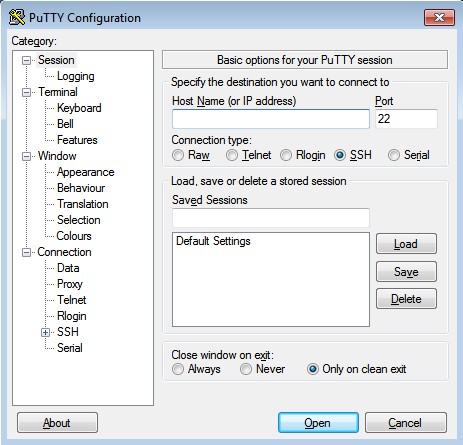
Image 1: Putty application.
Users connect remotely to a machine using Telnet, sometimes referred to as "Telnetting into the system". They are prompted to enter their username and password combination to access the remote computer, which enables the running of command lines as if logged in to the computer in person. Despite the physical location of users, their IP address will match the computer logged in to rather than the one physically used to connect.
To take telnet connection of the router, we must initially enable the virtual terminal connection in the router using console access. How do we do this? The below commands helps us to enable the virtual terminal in the router.
Router>enable
Router#configure terminal
Router(config)#username admin1 secret admin1pass
Router(config)#username admin2 secret admin2pass
Router(config)#line vty 0 4
Router(config-line)#transport input telnet
Router(config-line)#login local
Router(config-line)#exit
Router(config)#enable secret cisco123
Router(config)#exit
Router#show running-config
In the global configuration mode, enable router security by creating username and password for administrators using the command "username name secret password". Now to enable the virtual terminal of the router use the command "line vty 0 4". Here "vty" keyword stands for virtual teletype. This helps us to get Telnet/SSH access to the device. The abstract "0 4" means that the router can allow 5 simultaneous virtual connection. Mention the preferred type of protocol to use after the user has connected to a line using the command "transport input type of protocol". Enable login to the local user using the command "login local". Login is an option to specify if any one wants to connect to a vty line. It authenticates the user with the username and password.
An important thing to take note of is, if "enable secret password" is not enabled then the user can never go to enable/privileged mode. Unlike console where the user can go in without having an enable password. So in the priviledged mode type the command to enable password.
Image 2: show run command displays the transport type enabled in the router.
Now let’s try to take remote connection of the line using Telnet.
- Open putty application
- Host name -> router’s interface IP
- Connection type -> telnet
- Click open.
- Virtual terminal connection of the router opens up which will be a command line interface where the user can manage the router in the same way it is done in a console terminal. User gets a prompt to enter the username and password to login into the user mode. To enter the enable mode , router prompts the user with password configured for the same.
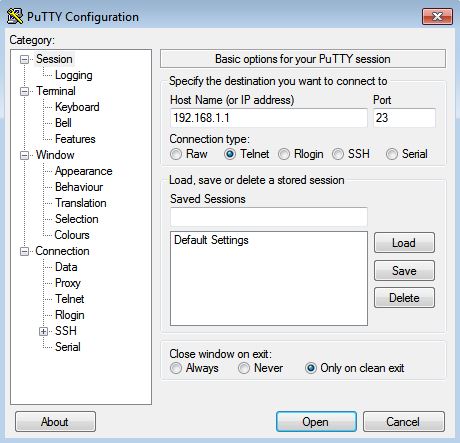
Image 3: Putty configuration to telnet.
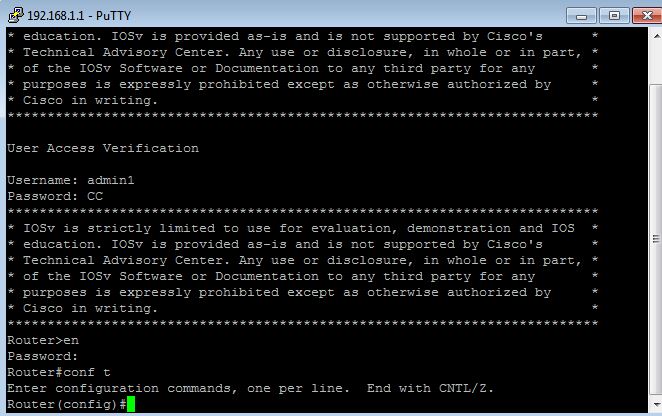
Image 4: username, password authentication on logging into the router using telnet and password authentication to access “enable mode”.
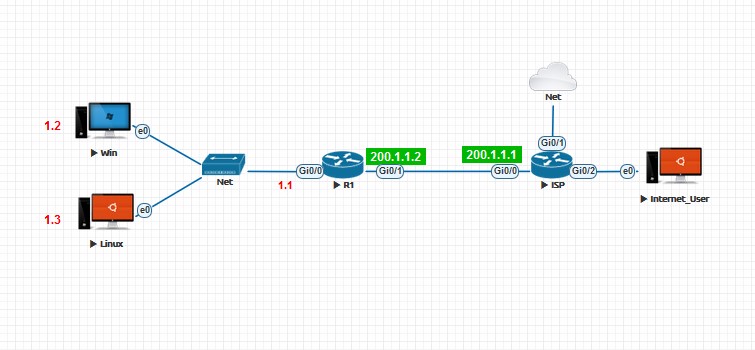
Image 5: Topology to demonstrate configuration using remote access.
- Enable virtual connection in the router using the console access.
- With the help of putty application in windows client, telnet to the router.
- Enable static routing using the telnet CLI.
- Check if internet is accessible from the clients.
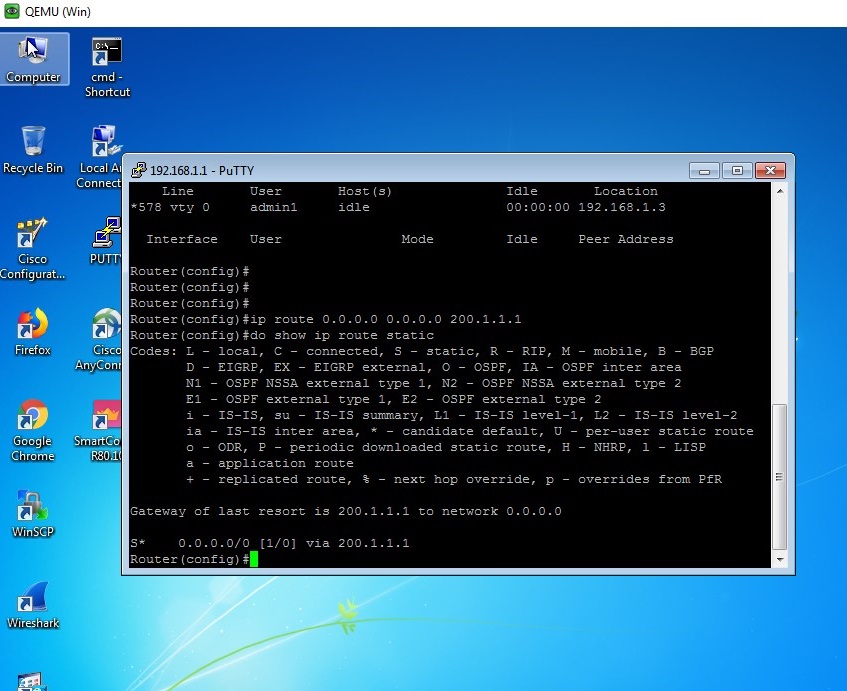
Image 6: Configuration of static routing using telnet access.
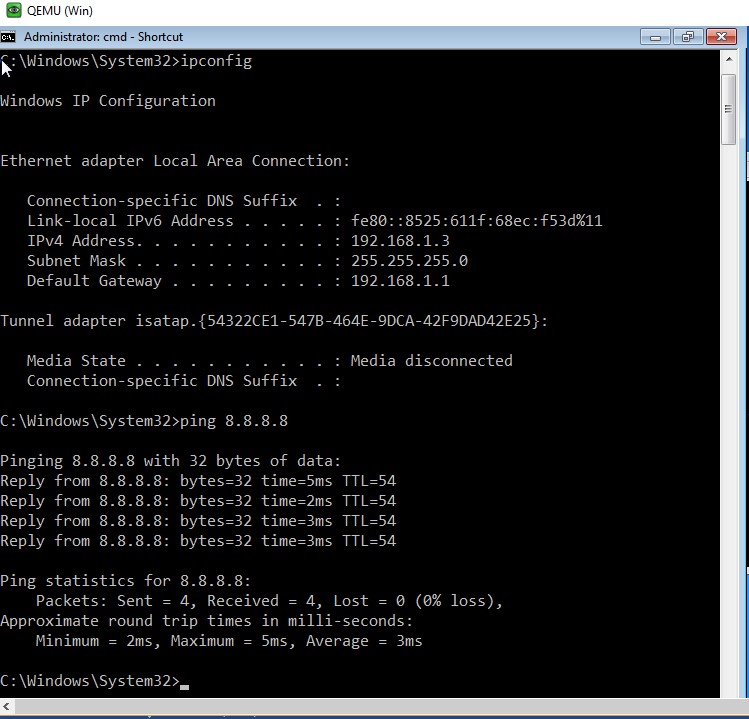
Image 7: Internet is accessible from the client.
We are now aware that routers are remotely accessible and telnet is one way to do it. But is Telnet safe?
Disadvantage of Telnet
The telnet session between the server and the client is not encrypted. Anyone with the access to the data flow between the communicating hosts can easily reconstruct the data that flows between the endpoints and read the message including username and password. This network attack requires very less expertise and be performed with available network debugging tools.
With the help of packet capture using Wireshark we can understand why Telnet is an unsecured protocol for accessing remote devices.
- After enabling the virtual connection and static routing in the router R1, start Wireshark packet capture for the interface Gi0/0 of the ISP router.
- Now from the internet user PC (refer above topology) let us telnet to the router R1 using the command "telnet host ip".
- Type the command "show running-config" which shows all the running configuration of the router.
- Now in wireshark, filter the protocol “telnet” and observe the payload of each request and response. We see that the user authentication, commands, output are all in clear text.
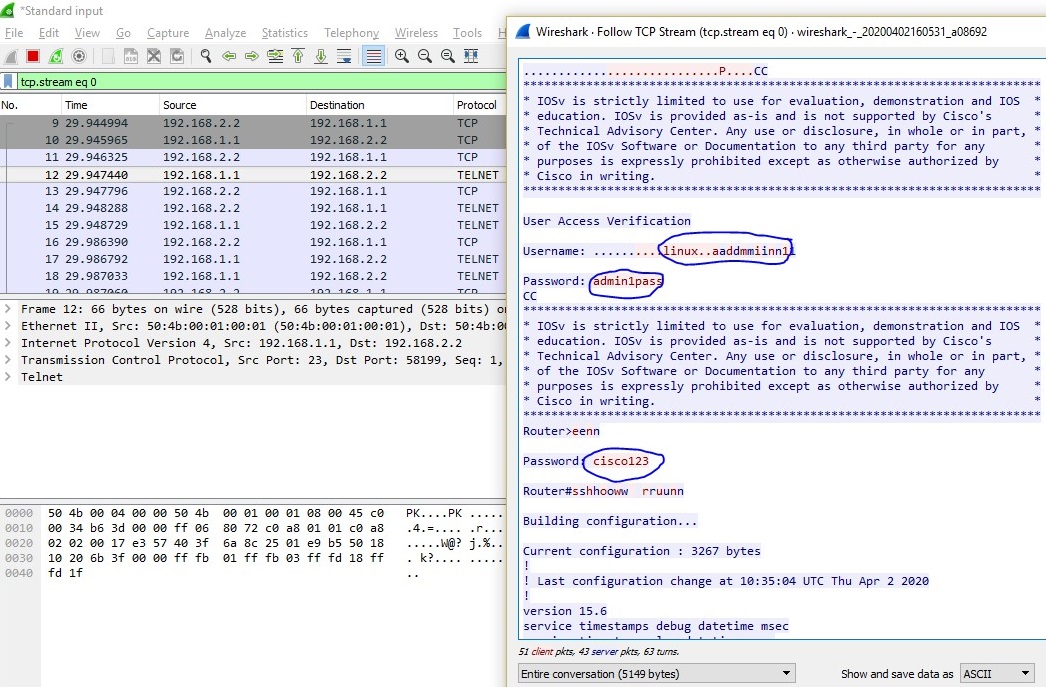
Image 8: Wireshark packet capture of Telnet traffic shows user authentication as clear text.
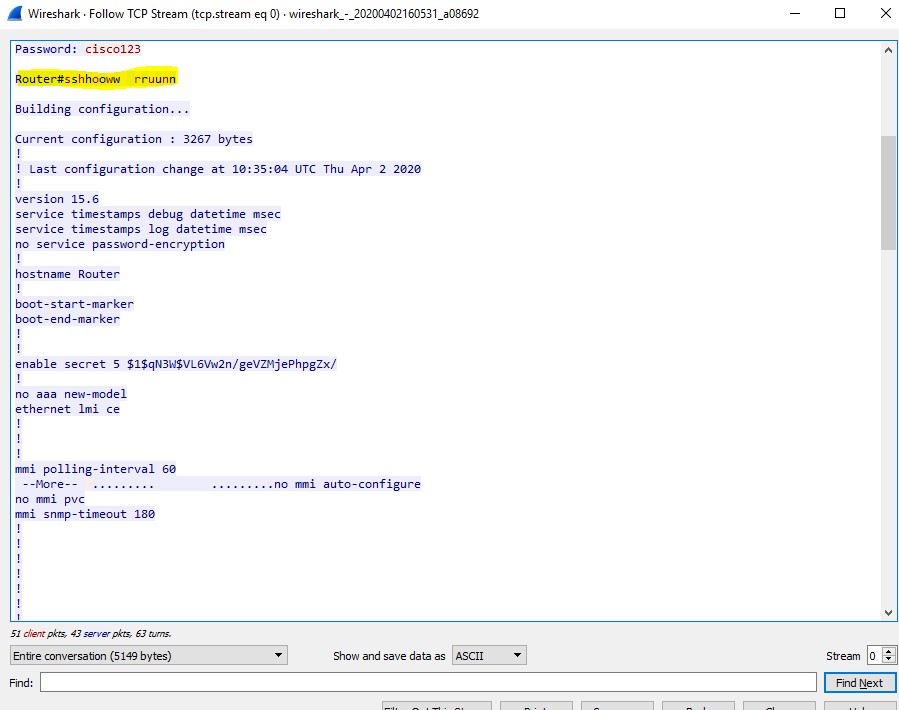
Image 9: Wireshark capture showing clear text of commands executed in the router.
SSH (Secure SHell)
Secure SHell is a cryptographic network protocol which uses encryption to secure the connection between the client and the server. All the data that is sent between the networking devices are secured.

Image 10: Simplified flow of a secure shell connection.
Here the connection is established by the SSH client and the client uses the public key to verify the identity of the SSH server. After this setup phase, the protocol uses encryption and hashing algorithms to ensure privacy of the data that is being shared between the client and the server. This allows administrators and other authorized users to connect to secure computers over a network that is not secure like the internet. Few such client applications which offers this SSH are- Putty
- SecureCRT
- Bitvise
To take SSH connection of the router, the virtual terminal connection in the router should be enabled. Since our router R1 here is already configured for Telnet, we need to remove it. The below commands helps us to remove the preferred type of protocol to use after the user has connected to a line.
Router>enable
Router#configure terminal
Router(config)#line vty 0 4
Router(config-line)#no transport input
Router(config-line)#ctrl+Z
The keyword "no" in front of the command "transport input telnet" removes the already configured preferred type of protocol. Now let us configure SSH in our router using the below commands.
Router>enable
Router#configure terminal
Router(config)#hostname R1
Router(config)#ip domain-name ng.net
Router(config)#crypto key generate rsa
The "hostname name" command is used to set the device’s name. The "ip domain-name name" command is used to set a domain name for the router. The "crypto key generate rsa" command is used to generate a key pair which will have a private and public RSA key. You will be unable to complete the crypto key generate rsa command without a hostname and IP domain name.
When prompted for the number of bits for the key give the value as 1024. Now we will have to set the preferred type of protocol as "SSH" using the below commands.
Router>enable
Router#configure terminal
Router(config)#line vty 0 4
Router(config-line)#transport input ssh
Router(config-line)#login local
Router(config-line)#exit
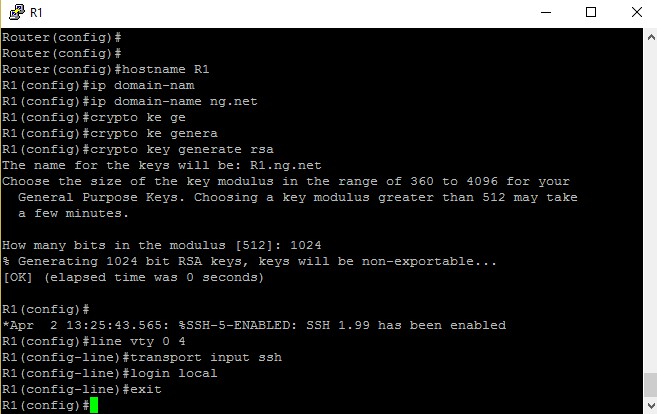
Image 11: Commands to enable SSH in router.
Now let’s try to take SSH connection of the line by following the below steps.
- Open putty application in the windows client.
- Host name -> router’s interface IP
- Connection type -> SSH
- Click open.
- Virtual terminal connection of the router opens up which will be a command line interface where the user can manage the router in the same way it is done in a console terminal.
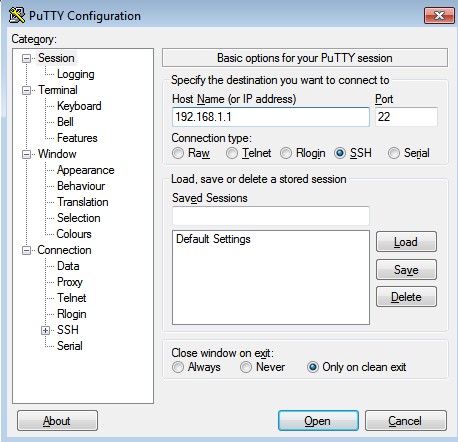
Image 12: Putty configuration for SSH.
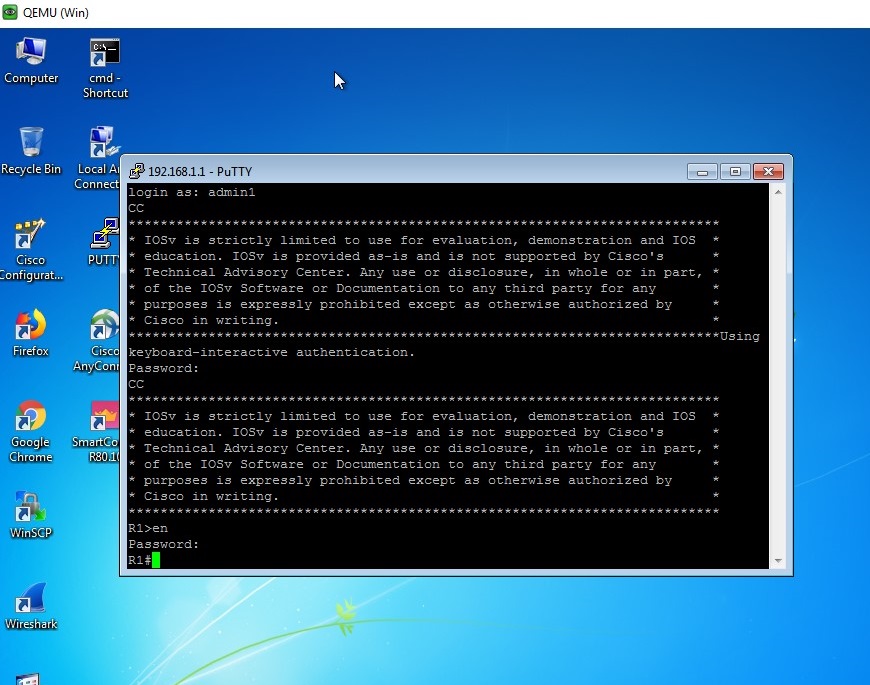
Image 13: Virtual terminal access using SSH.
We now have the secured connection between the client and the server. Let us look at the packet capture using Wireshark application.
- Start the Wireshark packet capture for the interface Gi0/0 of the ISP router.
- Now from the internet user PC (refer topology) let us ssh to the router R1 using the command "ssh username@host ip"
- Type the command "show running-config" which shows all the running configuration of the router.
- Now in Wireshark, filter the protocol “ssh” and observe the payload of each request and response. We see that the user authentication, commands, output are encrypted.
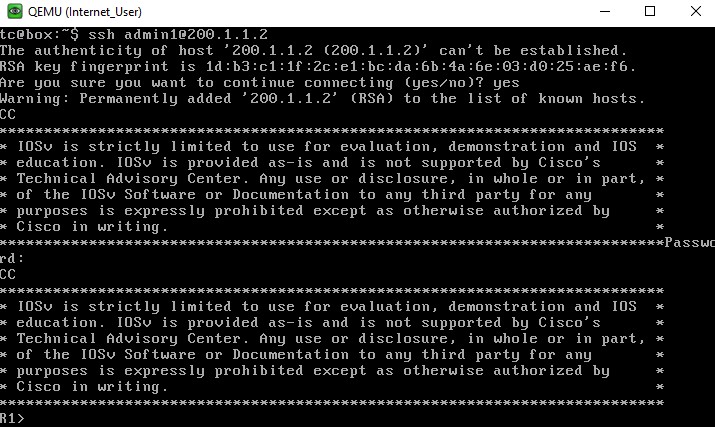
Image 14: SSH connection to the router from the internet user pc.
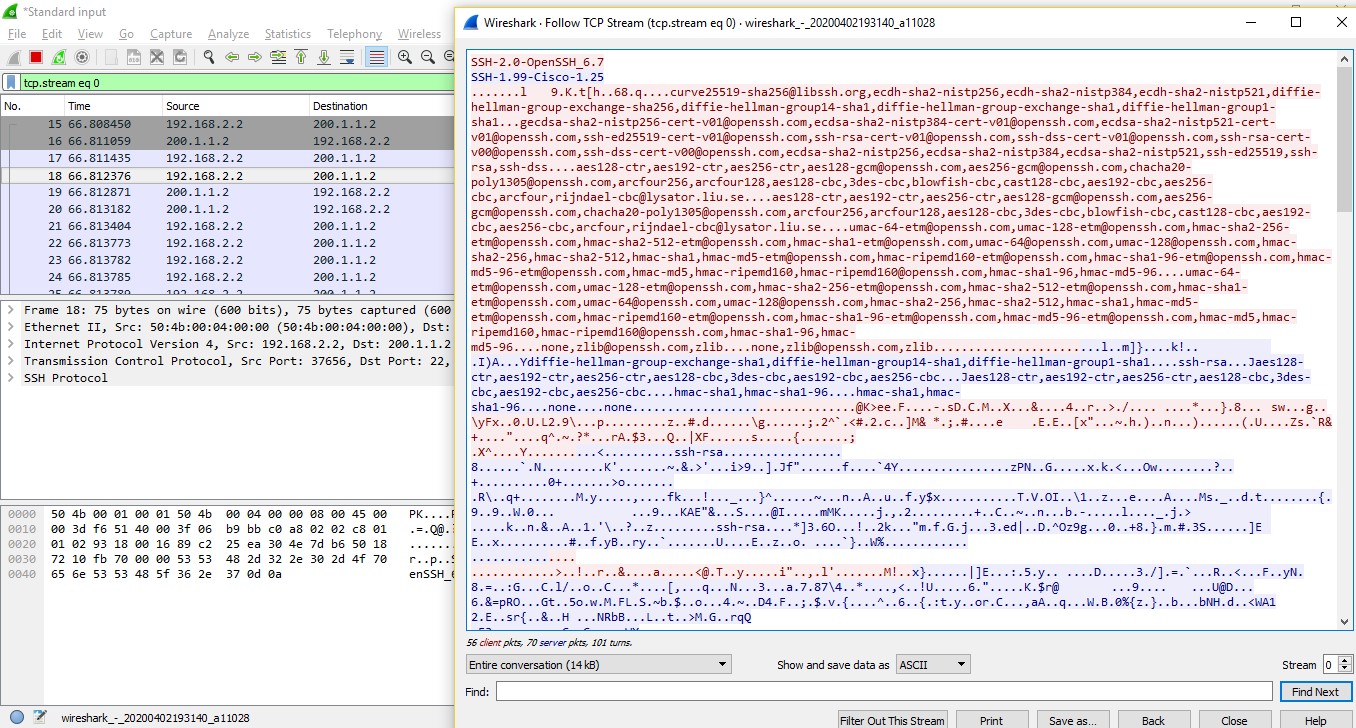
Image 15: Wireshark packet capture of SSH traffic shows user authentication, commands and output as encrypted text.
Advantage of SSH
By having data encryption over unsecured connections malware and potential hackers or attackers will have the inability to gain unauthorized access to the sensitive information your account has, or more commonly, your log in credentials. We can protect ourselves from attacks such as
- Spoofing of DNS
- Manipulation of data
- Sniffing of Data Transmission
- IP address spoofing
